How to self-host addy.io (AnonAddy)
- Assumptions
- Setting up the server
- DNS records
- Installing Postfix
- Installing Nginx
- Installing PHP
- Let's Encrypt
- Installing MariaDB
- Installing Redis
- Installing Rspamd
- The web application
- Installing Supervisor
- Creating your account
- Adding your private key to sign emails
- Setting up a local caching DNS resolver
- Adding MTA Strict Transport Security and SMTP TLS Reporting
- Enabling DANE by implementing DNSSEC and adding a TLSA record
- Adding Certification Authority Authorization
- Updating
Assumptions
This guide assumes that you are competent using the command line to manage an Ubuntu server and that you have already taken appropriate steps to harden and secure the server, for example: no root login, key auth only, 2FA, automatic security updates etc. I will not go over these here as there are already many great resources available covering this:
- https://github.com/imthenachoman/How-To-Secure-A-Linux-Server
- https://jacyhong.wordpress.com/2016/06/27/my-first-10-minutes-on-a-server-primer-for-securing-ubuntu/
You should have a fresh 22.04 Ubuntu server with Fail2ban, a Firewall (e.g UFW), and make sure that ports 25, 22 (or whatever your SSH port is if you've changed it) 443 and 80 are open.
Setting up the server
Choosing a provider (that you trust), UpCloud (referral link), Vultr (referral link), Greenhost, OVH, Hetzner (referral link), Linode, Cockbox (make sure the host allows port 25 to be used, some providers block it).
With Vultr and UpCloud you may need to open a support ticket and request for them to unblock port 25 as it is typically disabled by default.
Before starting you will want to check the IP of your new server to make sure it is not on many blacklists - https://multirbl.valli.org/lookup/
If it is, then check if the blacklists are just preventitive e.g. because the IP has no reverse DNS setup. These listings can easily be removed once you've correctly set up the server.
If the IP is on many blacklists specifically for sending out spam then it migt be best to destroy it and deploy a new one. You might notice that some providers such as Vultr have entire ranges of IPs listed.
Throughout these instructions I will be running all commands as a sudo user called johndoe. The domain used will be example.com and the hostname mail.example.com. I'll be using Vultr for this example (Note: if you also use Vultr for managing DNS records they do not currently support TSLA records required for DANE).
To check your server's hostname run:
hostname -f
If your hostname is not what it should be update it by running:
sudo hostnamectl set-hostname mail.example.com
Making sure to replace mail.example.com with your own domain.
DNS records
Now let's add some basic DNS records.
We'll start with the MX record. This tells email sent to your domain where it should go.
MX @ mail.example.com
We want to direct it to our server's fully qualifed domain name (FQDN). Give it a priority of 10 (or just make sure it has the lowest priority if you have other MX records).
If you want to be able to also use wildcard subdomains e.g. (alias@username.example.com) then you also need to add a wildcard MX record:
MX * mail.example.com
This will tell email sent to any subdomain of example.com to go to the same place.
Add a wildcard A and AAAA (if using IPv6) record too if you want to use all subdomains (or just an A record for unsubscribe.example.com if not).
A * <Your-IPv4-address>
AAAA * <Your-IPv6-address>
If you want to just use the example.com domain and not bother with subdomains then you can skip the wildcard MX, A, AAAA records above (you will still need to add MX and A/AAAA for unsubscribe.example.com though to handle deactivating aliases).
Next we will add an explicit A record for the hostname mail.example.com and for where the web app will be located app.example.com
A mail.example.com <Your-IPv4-address>
A app.example.com <Your-IPv4-address>
If you are using IPv6 then you will also need to add an AAAA record
AAAA mail.example.com <Your-IPv6-address>
AAAA app.example.com <Your-IPv6-address>
Make sure to replace the placeholders above with the actual IP address of your server.
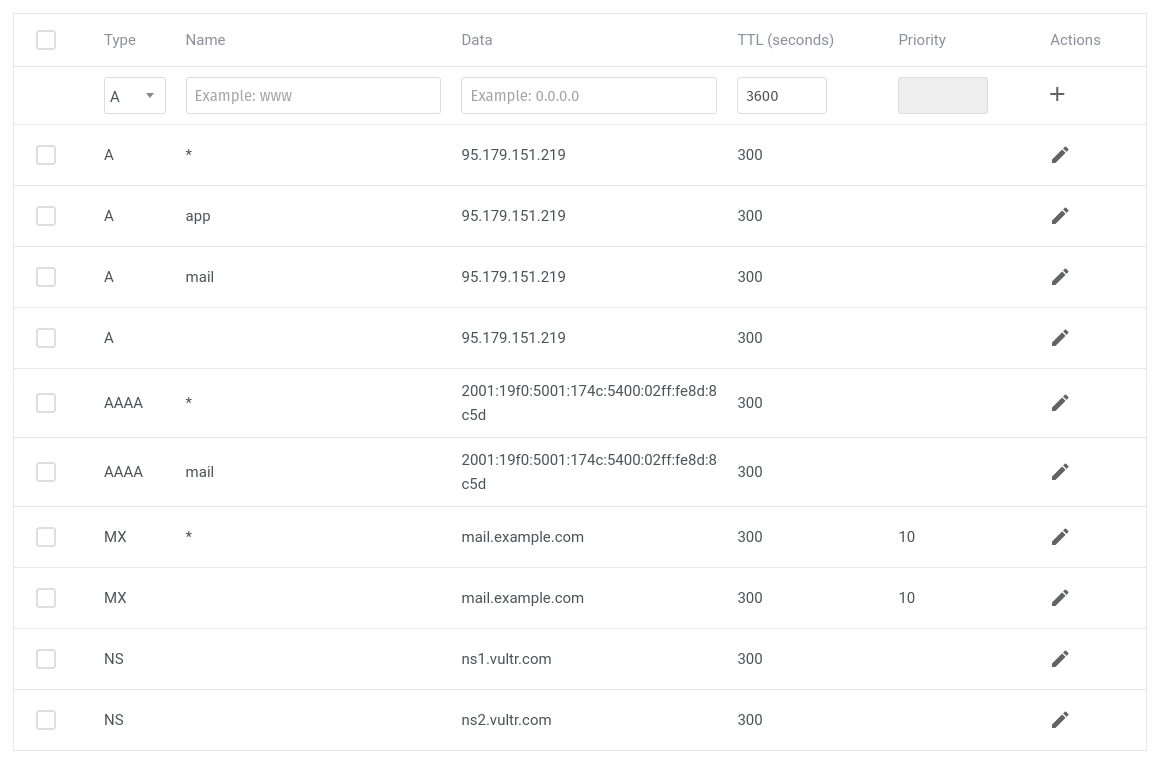
Now we need to set up the correct PTR record for reverse DNS lookups. This needs to be set as your FQDN (fully qualified domain name) which in our case is mail.example.com.
On your server run host <Your-IPv4-address> to check what it is.
You will likely need to login to your hosting provider to update your PTR record.
In Vultr you can update your reverse DNS by clicking on your server, then going to the settings tab, then IPv4 and click on the value in the "Reverse DNS" column.
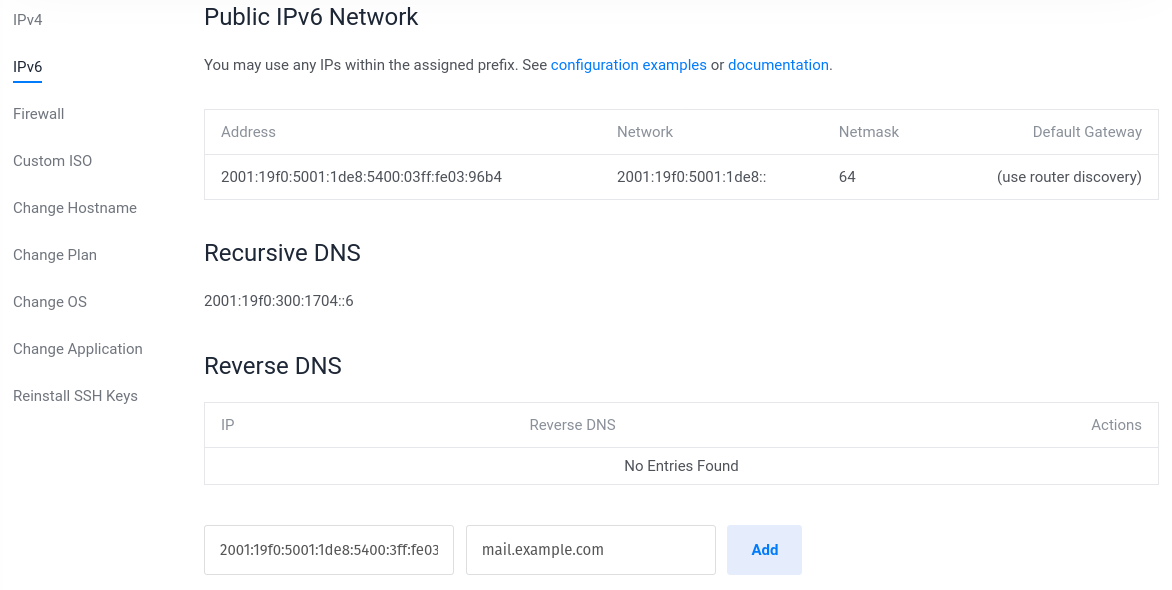
Change it to mail.example.com. Don't forget to update this for IPv6 if you are using it too.
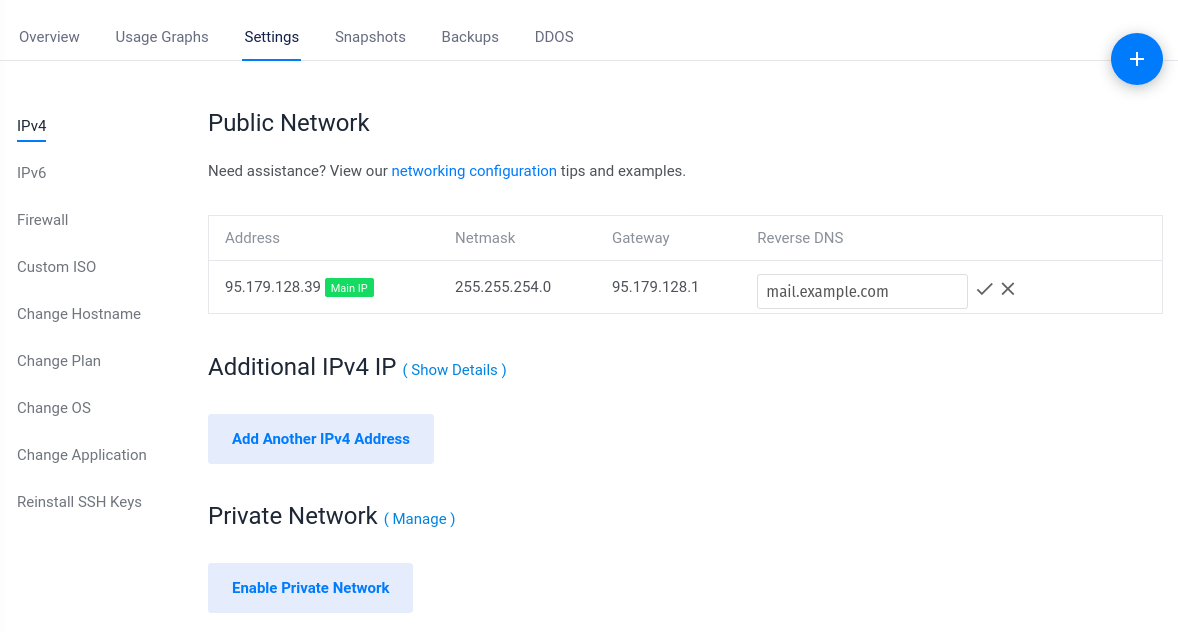
You can check that it is set correctly by entering your IPv4 and IPv6 addresses here https://mxtoolbox.com/ReverseLookup.aspx.
Installing Postfix
Now we're going to install our MTA (mail transfer agent) Postfix.
sudo apt update
sudo apt install postfix
For configuration type select "Internet Site".
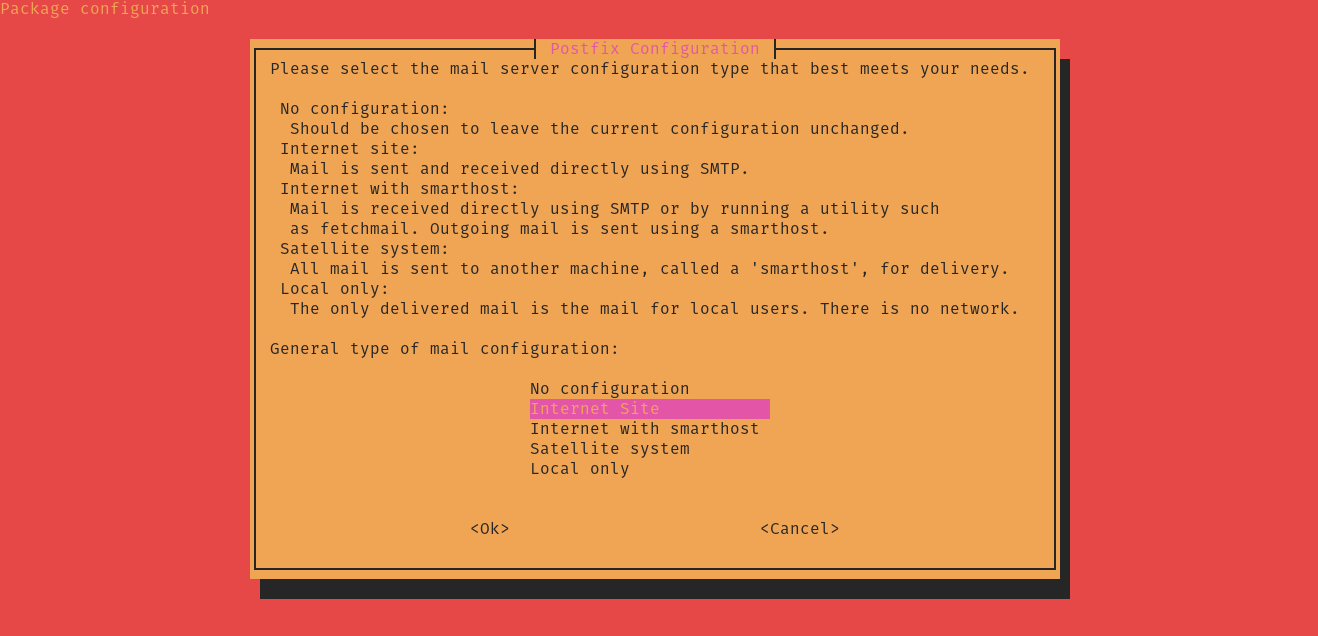
For System mail name: enter "example.com" note the missing mail subdomain.
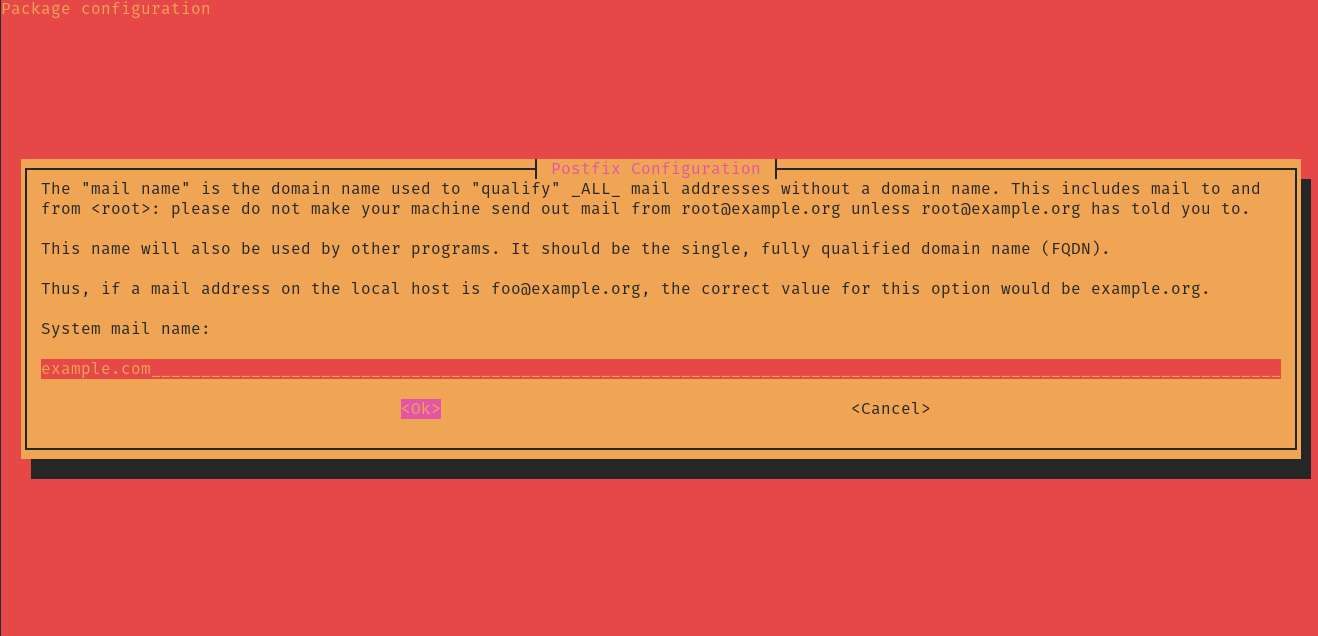
Postfix should now begin installing.
If you would like to check the version of Postfix that you are running you can do:
sudo postconf mail_version
At the time of writing this I am running mail_version = 3.6.4.
We'll install an extension we will need later so that Postfix can query our database.
sudo apt install postfix-mysql
Now let's update our Postfix config file. A lot of the items in this file don't exist yet, but don't worry, we'll create them soon.
sudo vim /etc/postfix/main.cf
Or use nano if you like.
Replace the file contents with the following (replacing example.com with your own domain):
smtpd_banner = $myhostname ESMTP
biff = no

# appending .domain is the MUA's job.
append_dot_mydomain = no

readme_directory = no

compatibility_level = 3.6

# SMTPD
smtpd_tls_cert_file=/etc/nginx/conf.d/example.com.d/server.crt
smtpd_tls_key_file=/etc/nginx/conf.d/example.com.d/server.key
smtpd_use_tls=yes
smtpd_tls_session_cache_database = btree:${data_directory}/smtpd_scache
smtpd_tls_CApath = /etc/ssl/certs
smtpd_tls_security_level = may
smtpd_tls_protocols = !SSLv2, !SSLv3, !TLSv1
smtpd_tls_loglevel = 1
smtpd_tls_session_cache_database = btree:${data_directory}/smtpd_scache
smtpd_tls_mandatory_exclude_ciphers = MD5, DES, ADH, RC4, PSD, SRP, 3DES, eNULL, aNULL
smtpd_tls_exclude_ciphers = MD5, DES, ADH, RC4, PSD, SRP, 3DES, eNULL, aNULL
smtpd_tls_mandatory_protocols = !SSLv2, !SSLv3, !TLSv1
smtpd_tls_mandatory_ciphers = high
smtpd_tls_ciphers = high
smtpd_tls_eecdh_grade = ultra
tls_high_cipherlist=EECDH+ECDSA+AESGCM:EECDH+aRSA+AESGCM:EECDH+ECDSA+SHA384:EECDH+ECDSA+SHA256:EECDH+aRSA+SHA384:EECDH+aRSA+SHA256:EECDH+aRSA+RC4:EECDH:EDH+aRSA:RC4:!aNULL:!eNULL:!LOW:!3DES:!MD5:!EXP:!PSK:!SRP:!DSS
tls_preempt_cipherlist = yes
tls_ssl_options = NO_COMPRESSION

# SMTP
smtp_tls_CApath = /etc/ssl/certs
smtp_use_tls=yes
smtp_tls_loglevel = 1
smtp_tls_session_cache_database = btree:${data_directory}/smtp_scache
smtp_tls_mandatory_protocols = !SSLv2, !SSLv3, !TLSv1
smtp_tls_protocols = !SSLv2, !SSLv3, !TLSv1
smtp_tls_mandatory_ciphers = high
smtp_tls_ciphers = high
smtp_tls_mandatory_exclude_ciphers = MD5, DES, ADH, RC4, PSD, SRP, 3DES, eNULL, aNULL
smtp_tls_exclude_ciphers = MD5, DES, ADH, RC4, PSD, SRP, 3DES, eNULL, aNULL
smtp_tls_security_level = may

smtpd_relay_restrictions = permit_mynetworks permit_sasl_authenticated defer_unauth_destination
myhostname = mail.example.com
mydomain = example.com
alias_maps = hash:/etc/aliases
alias_database = hash:/etc/aliases
myorigin = /etc/mailname

mydestination = localhost.$mydomain, localhost

virtual_transport = anonaddy:
virtual_mailbox_domains = $mydomain, unsubscribe.$mydomain, mysql:/etc/postfix/mysql-virtual-alias-domains-and-subdomains.cf

relayhost =
mynetworks = 127.0.0.0/8 [::ffff:127.0.0.0]/104 [::1]/128
mailbox_size_limit = 0
recipient_delimiter = +
inet_interfaces = all
inet_protocols = all

local_recipient_maps =

smtpd_helo_required = yes
smtpd_helo_restrictions =
    permit_mynetworks
    permit_sasl_authenticated
    reject_invalid_helo_hostname
    reject_non_fqdn_helo_hostname
    reject_unknown_helo_hostname

smtpd_sender_restrictions =
   permit_mynetworks
   permit_sasl_authenticated
   reject_non_fqdn_sender
   reject_unknown_sender_domain
   reject_unknown_reverse_client_hostname

smtpd_recipient_restrictions =
   permit_mynetworks,
   reject_unauth_destination,
   check_policy_service unix:private/policy,
   reject_rhsbl_helo dbl.spamhaus.org,
   reject_rhsbl_reverse_client dbl.spamhaus.org,
   reject_rhsbl_sender dbl.spamhaus.org,
   reject_rbl_client zen.spamhaus.org
   reject_rbl_client dul.dnsbl.sorbs.net

# Block clients that speak too early.
smtpd_data_restrictions = reject_unauth_pipelining

# Milter configuration
milter_default_action = accept
milter_protocol = 6
smtpd_milters = inet:localhost:11332
non_smtpd_milters = $smtpd_milters
milter_mail_macros =  i {mail_addr} {client_addr} {client_name} {auth_authen}

disable_vrfy_command = yes
strict_rfc821_envelopes = yes
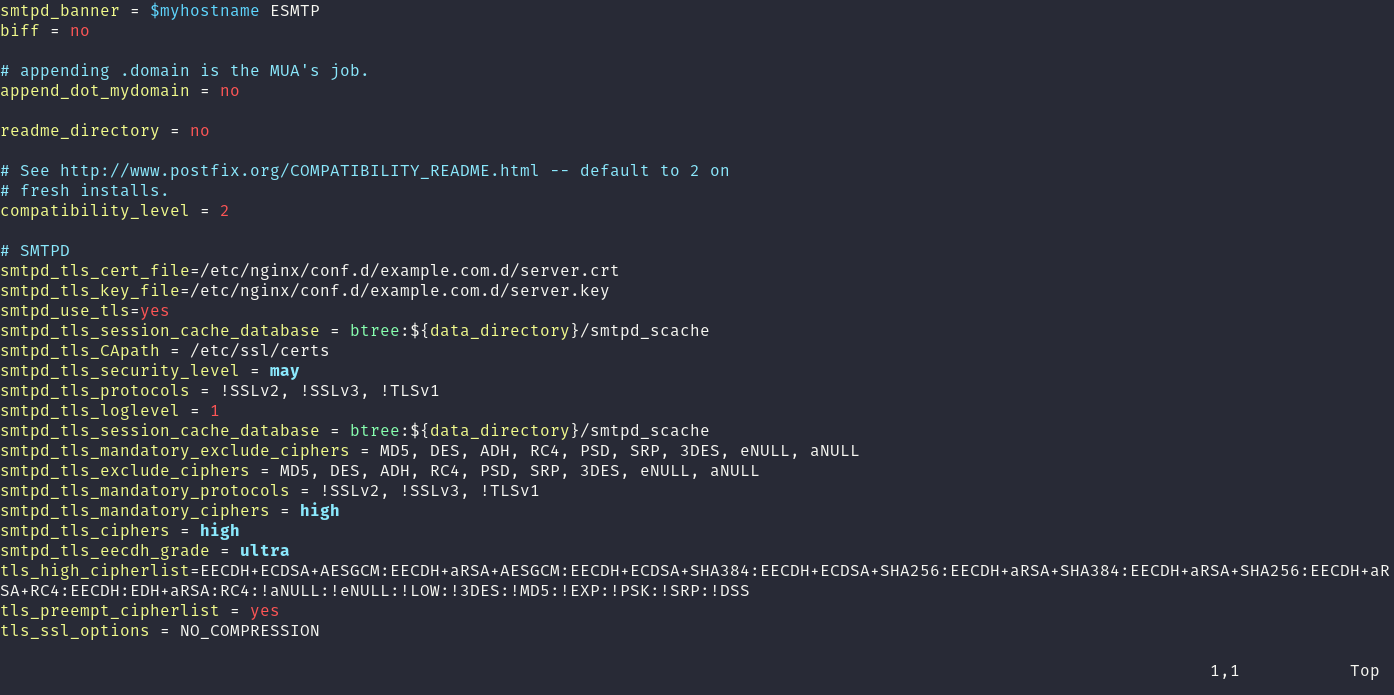
Make sure your hostname is correct in the Postfix config file.
sudo postconf myhostname
You'll see warnings that the mysql-... files do not exist. You should see mail.example.com, if you don't edit /etc/postfix/main.cf and update the myhostname value.
Open up /etc/postfix/master.cf and add these lines to the bottom of the file:
# Pipe to addy.io application
anonaddy unix - n n - - pipe
  flags=F user=johndoe argv=php /var/www/anonaddy/artisan anonaddy:receive-email --sender=${sender} --recipient=${recipient} --local_part=${user} --extension=${extension} --domain=${domain} --size=${size}

# addy.io access policy
policy  unix  -       n       n       -       0       spawn
  user=johndoe argv=php /var/www/anonaddy/postfix/AccessPolicy.php
Making sure to replace johndoe with the username of the user who will run the artisan command and also to update the /path to wherever you plan to place the web app installation. For this tutorial I'm going to use the location /var/www/anonaddy.
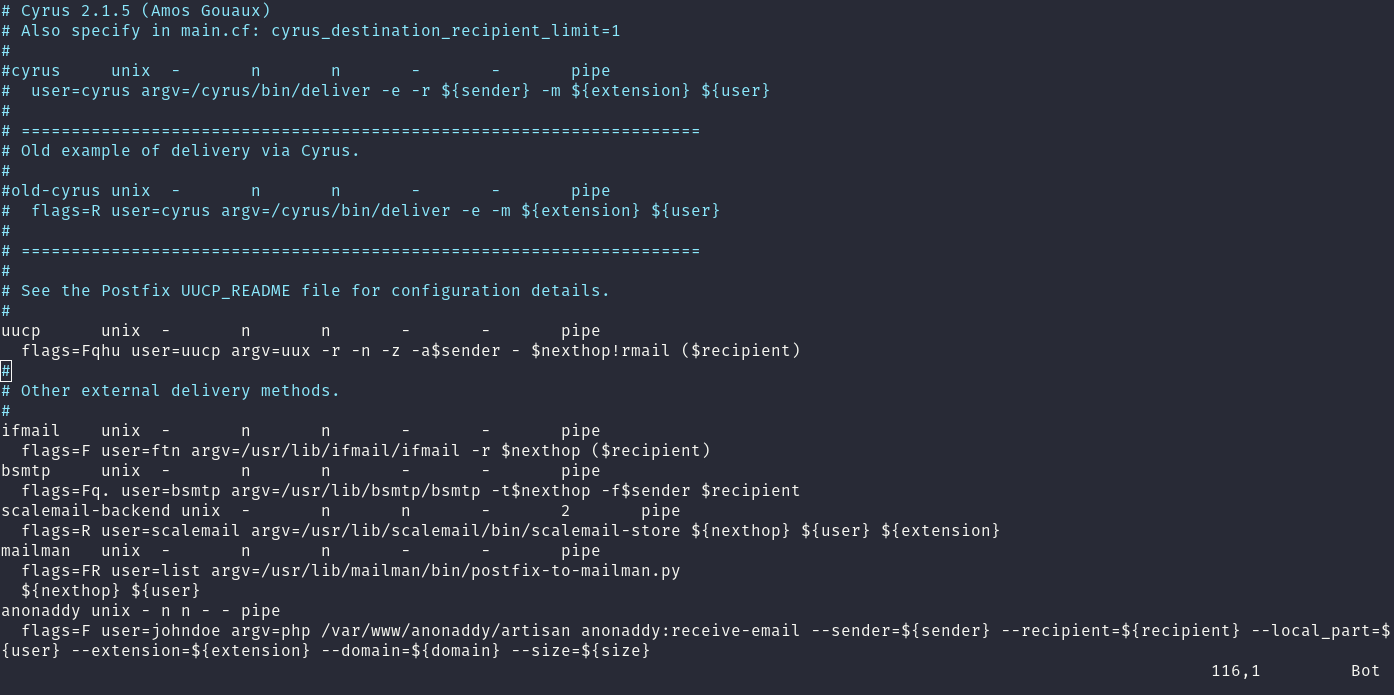
This command will pipe the email through to our application so that we can determine who the alias belongs to and who to forward the email to.
Installing Nginx
To install Nginx first add the prerequisites add then add the following signing key and repo (instructions taken from nginx.org).
Import the nginx signing key and the repository.
sudo apt install curl gnupg2 ca-certificates lsb-release ubuntu-keyring

curl https://nginx.org/keys/nginx_signing.key | gpg --dearmor \
    | sudo tee /usr/share/keyrings/nginx-archive-keyring.gpg >/dev/null

echo "deb [signed-by=/usr/share/keyrings/nginx-archive-keyring.gpg] \
http://nginx.org/packages/mainline/ubuntu `lsb_release -cs` nginx" \
    | sudo tee /etc/apt/sources.list.d/nginx.list

echo -e "Package: *\nPin: origin nginx.org\nPin: release o=nginx\nPin-Priority: 900\n" \
    | sudo tee /etc/apt/preferences.d/99nginx
Then you can Install and check the version.
sudo apt update
sudo apt install nginx
sudo nginx -v
At the time of writing this I have nginx version: nginx/1.25.2.
Create the directory for where the application will be stored.
sudo mkdir -p /var/www/
sudo chown -R $USER:$USER /var/www/
sudo chmod -R 755 /var/www/
First we'll generate a stronger DHE parameter for Nginx by running:
sudo mkdir /etc/nginx/ssl
sudo openssl dhparam -out /etc/nginx/ssl/dhparam.pem 4096
The above command will take quite some time, so go grab a cup of tea/coffee!
Next create the Nginx server block:
sudo mkdir /etc/nginx/conf.d/example.com.d
sudo nano /etc/nginx/conf.d/example.com.conf
Add the following inside
server {
        listen 80;
        listen [::]:80;

        server_name app.example.com;
        return 301 https://$server_name$request_uri;
}

server {
    listen 443 ssl;
    listen [::]:443 ssl;
    server_name app.example.com;
    root /var/www/anonaddy/public;
    server_tokens off;
    http2 on;

    add_header X-Frame-Options "SAMEORIGIN";
    add_header X-XSS-Protection "1; mode=block";
    add_header X-Content-Type-Options "nosniff";
    add_header Strict-Transport-Security "max-age=63072000; includeSubDomains; preload";
    add_header Content-Security-Policy "default-src 'self'; script-src 'self' 'unsafe-inline' 'unsafe-eval'; img-src 'self' data:; style-src 'self' 'unsafe-inline'; font-src 'self'; object-src 'none'";
    add_header Referrer-Policy "origin-when-cross-origin";
    add_header Expect-CT "enforce, max-age=604800";

    index index.html index.htm index.php;

    charset utf-8;

    ssl_certificate             /etc/nginx/conf.d/example.com.d/server.crt;
    ssl_certificate_key         /etc/nginx/conf.d/example.com.d/server.key;
    ssl_trusted_certificate     /root/.acme.sh/example.com/fullchain.cer;

    ssl_prefer_server_ciphers   on;
    ssl_session_timeout         5m;
    ssl_protocols               TLSv1.2 TLSv1.3;
    ssl_stapling                on;
    ssl_stapling_verify         on;
    ssl_ciphers                 "ECDHE-ECDSA-AES128-GCM-SHA256:ECDHE-RSA-AES128-GCM-SHA256:ECDHE-ECDSA-AES256-GCM-SHA384:ECDHE-RSA-AES256-GCM-SHA384:ECDHE-ECDSA-CHACHA20-POLY1305:ECDHE-RSA-CHACHA20-POLY1305:DHE-RSA-AES128-GCM-SHA256:DHE-RSA-AES256-GCM-SHA384";
    ssl_ecdh_curve              secp384r1;
    ssl_session_cache           shared:SSL:10m;
    ssl_session_tickets         off;
    ssl_dhparam                 /etc/nginx/ssl/dhparam.pem;

    location / {
        try_files $uri $uri/ /index.php?$query_string;
    }

    location = /favicon.ico { access_log off; log_not_found off; }
    location = /robots.txt  { access_log off; log_not_found off; }

    error_page 404 /index.php;

    location ~ \.php$ {
        fastcgi_pass unix:/var/run/php/php8.2-fpm.sock;
        fastcgi_index index.php;
        fastcgi_param SCRIPT_FILENAME $realpath_root$fastcgi_script_name;
        include fastcgi_params;
    }

    location ~ /\.(?!well-known).* {
        deny all;
    }
}
sudo nano /etc/nginx/nginx.conf
Change the user to johndoe.
We won't restart nginx yet because it won't be able to find the SSL certificates and will throw an error.
Installing PHP
We're going to install the latest version of PHP at the time of writing this - version 8.2
First we need to add the following repository so we can install PHP8.2.
sudo apt install software-properties-common
sudo add-apt-repository ppa:ondrej/php
sudo apt update
Install PHP8.2 and the required extensions.
sudo apt install php8.2-fpm php8.2-common php8.2-mysql php8.2-dev php8.2-gmp php8.2-mbstring php8.2-dom php8.2-gd php8.2-imagick php8.2-opcache php8.2-soap php8.2-zip php8.2-cli php8.2-curl php8.2-mailparse php8.2-gnupg php8.2-redis -y
sudo nano /etc/php/8.2/fpm/pool.d/www.conf
user = johndoe
group = johndoe
listen.owner = johndoe
listen.group = johndoe
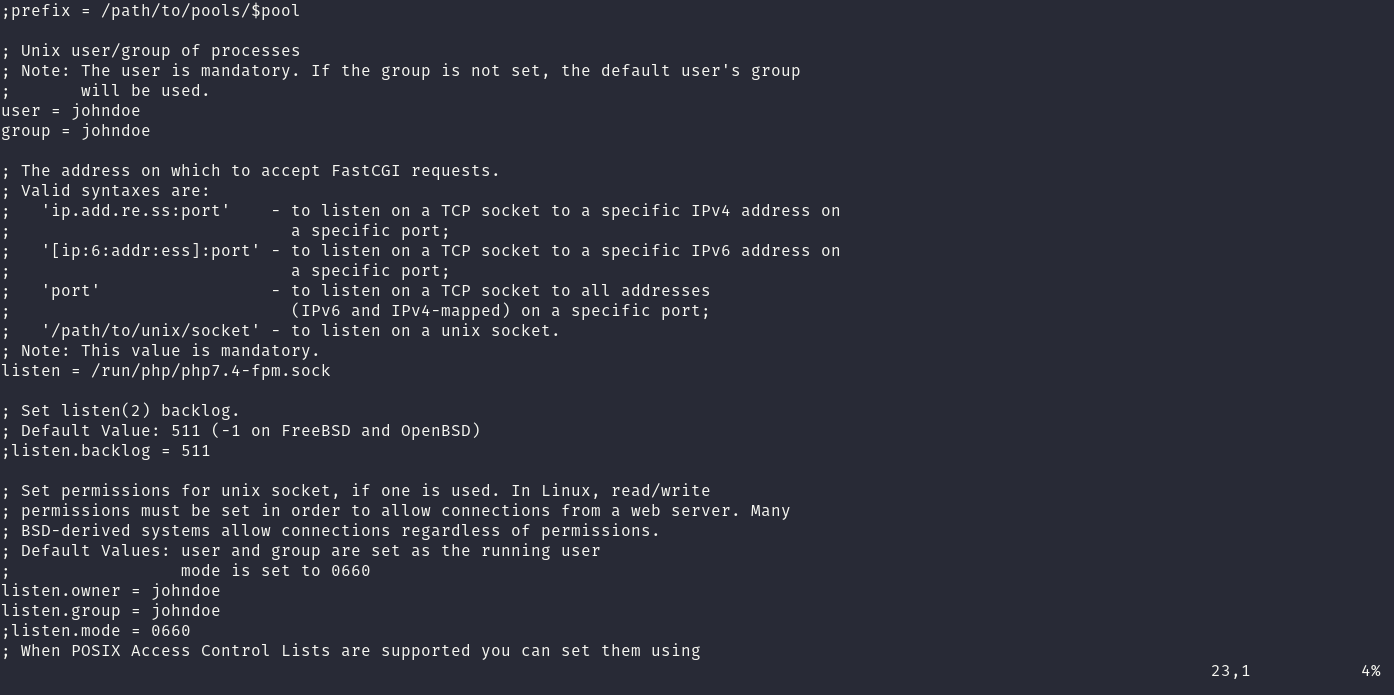
Restart php8.2-fpm to reflect the changes.
sudo service php8.2-fpm restart
Let's Encrypt
Now we need to get an SSL certificate using Acme.sh.
We again need to switch to the root user to run these commands:
sudo su
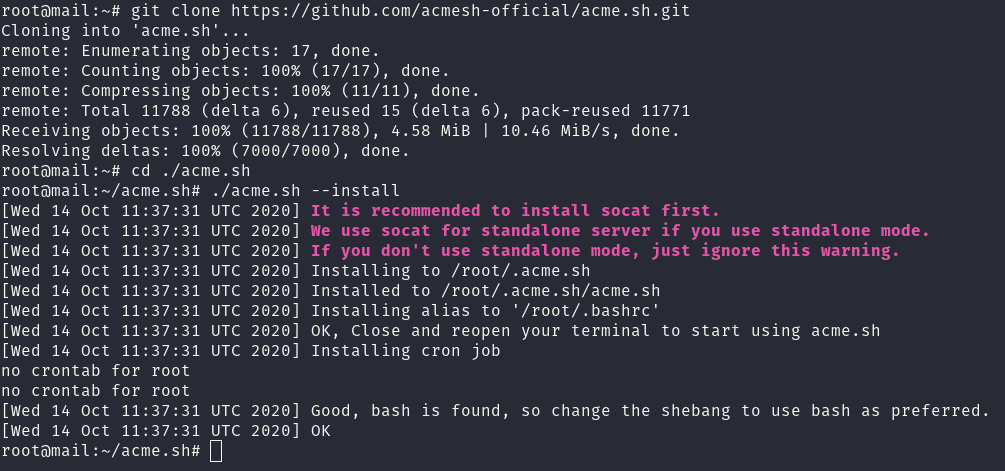
Download the install script from GitHub and run it. (you can install git by running sudo apt install git)
cd ~
git clone https://github.com/acmesh-official/acme.sh.git
cd ./acme.sh
./acme.sh --install
You should set up automatic DNS API integration for wildcard certs if you are using them, this will allow automatic renewal of your certificates.
https://github.com/acmesh-official/acme.sh#8-automatic-dns-api-integration
For example, instructions for Vultr are here - https://github.com/acmesh-official/acme.sh/wiki/dnsapi#82-use-vultr-dns-api-to-automatically-issue-cert
I would run:
export VULTR_API_KEY="<Your API key>"
To install the certificate run:
./acme.sh --issue -d example.com -d '*.example.com' --dns dns_vultr \
--keylength 4096 \
--key-file       /etc/nginx/conf.d/example.com.d/server.key  \
--fullchain-file /etc/nginx/conf.d/example.com.d/server.crt \
--reloadcmd     "service nginx force-reload"
Make sure to change example.com to your domain.
You might see the following error message "Run reload cmd: service nginx force-reload nginx.service is not active, cannot reload.", this can be ignored.
You can now type exit to go back to the johndoe user instead of root.
Installing MariaDB
At the time of writing this the latest stable release is v11.1. Make sure to check for any newer releases.
Follow the instructions on this link to install MariaDB:
https://mariadb.org/download/?t=repo-config&d=22.04+%22jammy%22&v=11.1&r_m=starburst
Make sure it is running correctly and check the version
sudo systemctl status mariadb
sudo mariadb -V
At the time of writing this I am using "mariadb from 11.1.2-MariaDB, client 15.2"
When running securing mariadb Answer no for "Switch to unix_socket authentication" and yes for "Change the root password?" (Set a secure MySQL root password and make a note of it somewhere e.g. password manager.). Answer yes (default) to the other questions.
sudo mariadb-secure-installation
Next we're going to create the database and also a user with correct permissions.
sudo mariadb -u root -p
Once in the MariaDB shell create a new database called anonaddy_database (or whatever you like)
CREATE DATABASE anonaddy_database DEFAULT CHARACTER SET utf8mb4 DEFAULT COLLATE utf8mb4_unicode_ci;
Then create a new user and give them a strong password (replace below)
CREATE USER 'anonaddy'@'localhost' IDENTIFIED BY 'STRONG-PASSWORD-HERE';
Grant the user privileges for the new database.
GRANT ALL PRIVILEGES ON anonaddy_database.* TO 'anonaddy'@'localhost';
Next flush privileges and exit the MariaDB shell.
FLUSH PRIVILEGES;
exit
Create a new file /etc/postfix/mysql-virtual-alias-domains-and-subdomains.cf and enter the following inside:
user = anonaddy
password = your-database-password
hosts = 127.0.0.1
dbname = anonaddy_database
query = SELECT (SELECT 1 FROM usernames WHERE '%s' IN (CONCAT(username, '.example.com'))) AS usernames, (SELECT 1 FROM domains WHERE domain = '%s' AND domain_verified_at IS NOT NULL) AS domains LIMIT 1;
If you need to add multiple domains then just update the above query to:
query = SELECT (SELECT 1 FROM usernames WHERE '%s' IN (CONCAT(username, '.example.com'),CONCAT(username, '.example2.com'))) AS usernames, (SELECT 1 FROM domains WHERE domain = '%s' AND domain_verified_at IS NOT NULL) AS domains LIMIT 1;
This file is responsible for determining whether the server should accept email for a certain domain/subdomain. If no results are found from the query then the email will not be accepted.
The reason these SQL queries are not all nicely formatted is because they have to be on one line.
Update the permissions and the group of this file:
sudo chmod o= /etc/postfix/mysql-virtual-alias-domains-and-subdomains.cf

sudo chgrp postfix /etc/postfix/mysql-virtual-alias-domains-and-subdomains.cf
Let's also restart Postfix now that we have created the files for it:
sudo service postfix restart
Installing Redis
Redis is an advanced key-value store that we will use for caching, sessions, queues and more. To install Redis, run the following commands (instructions from https://redis.io/docs/getting-started/installation/install-redis-on-linux/):
# Install prerequisites
sudo apt install lsb-release curl gpg

curl -fsSL https://packages.redis.io/gpg | sudo gpg --dearmor -o /usr/share/keyrings/redis-archive-keyring.gpg

echo "deb [signed-by=/usr/share/keyrings/redis-archive-keyring.gpg] https://packages.redis.io/deb $(lsb_release -cs) main" | sudo tee /etc/apt/sources.list.d/redis.list

sudo apt update

sudo apt install redis-server
Next edit the Redis config file.
sudo nano /etc/redis/redis.conf
Find the line with supervised auto and update it to supervised systemd. Also make sure the line bind 127.0.0.1 -::1 is present and uncommented which binds Redis to localhost.
Next we will add a strong password for Redis in the same redis.conf file.
Find the line # requirepass foobared, uncomment this line and change "foobared" to a very strong password. (You can generate one using openssl rand 60 | openssl base64 -A)
Save the file and restart Redis to reflect the changes.
sudo service redis-server restart
Now run:
redis-cli
Then type ping. You'll be promted for the password we just added. You can enter auth your-password to authenticate.
Type exit to quit the redis-cli.
Installing Rspamd
Rspamd is a fast, free and open-source spam filtering system. It can also handle DKIM/ARC signing, SPF checks, DMARC checks, DKIM checks, RBLs and much more.
To install Rspamd run the following commands (instructions from https://www.rspamd.com/downloads.html):
sudo apt install -y lsb-release wget gpg

CODENAME=`lsb_release -c -s`

sudo mkdir -p /etc/apt/keyrings

wget -O- https://rspamd.com/apt-stable/gpg.key | gpg --dearmor | sudo tee /etc/apt/keyrings/rspamd.gpg > /dev/null

echo "deb [signed-by=/etc/apt/keyrings/rspamd.gpg] http://rspamd.com/apt-stable/ $CODENAME main" | sudo tee /etc/apt/sources.list.d/rspamd.list

echo "deb-src [signed-by=/etc/apt/keyrings/rspamd.gpg] http://rspamd.com/apt-stable/ $CODENAME main"  | sudo tee -a /etc/apt/sources.list.d/rspamd.list

sudo apt update
sudo apt --no-install-recommends install rspamd
Next let's use Rspamd to create a new DKIM key pair.
First make a new directory:
sudo mkdir /var/lib/rspamd/dkim
Change the below command from example.com to your domain name:
sudo rspamadm dkim_keygen -s 'default' -b 2048 -d example.com -k /var/lib/rspamd/dkim/example.com.default.key | sudo tee -a /var/lib/rspamd/dkim/example.com.default.pub
Set the correct ownership and permissions:
sudo chown -R _rspamd: /var/lib/rspamd/dkim
sudo chmod 750 /var/lib/rspamd/dkim
sudo chmod 440 /var/lib/rspamd/dkim/example.com.default.key /var/lib/rspamd/dkim/example.com.default.pub
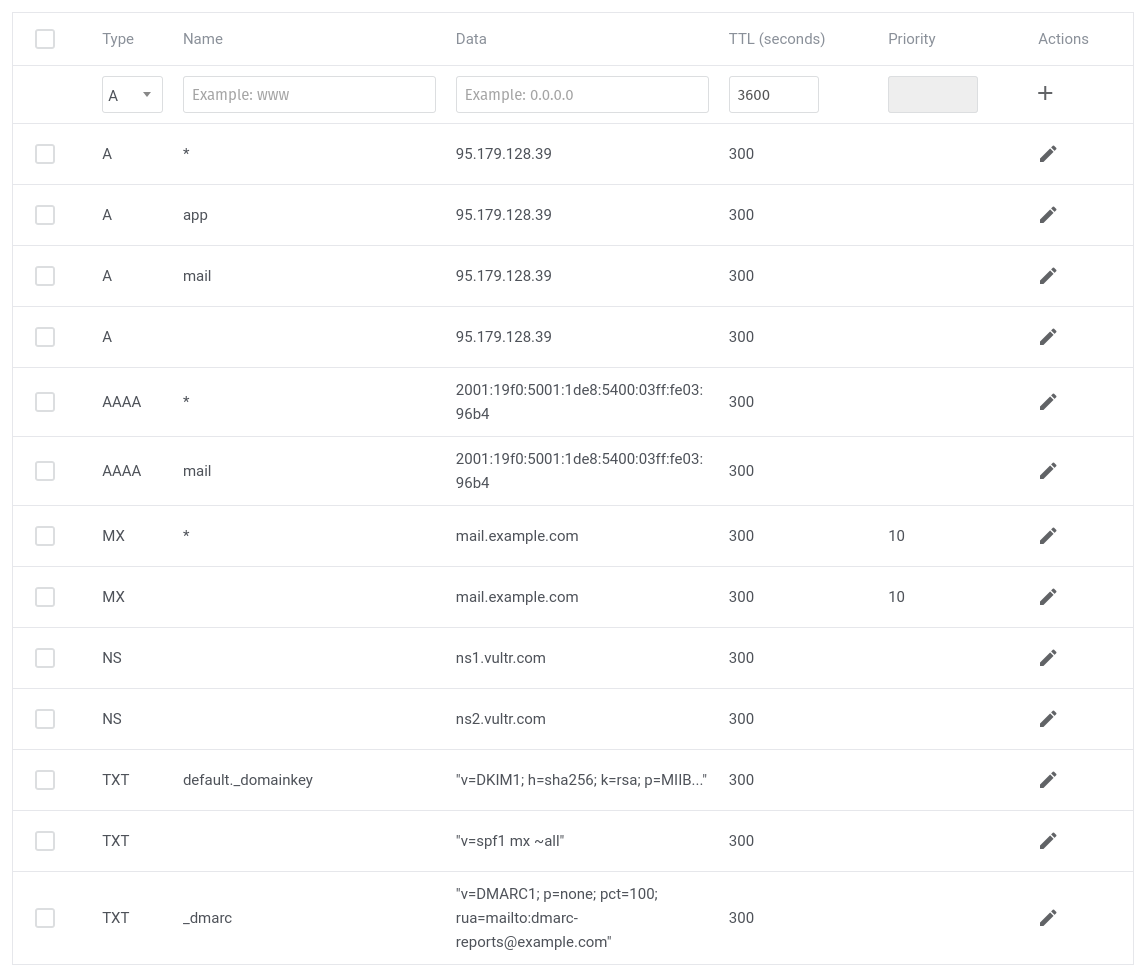
You will now need to create a new TXT record for your domain for this key.
sudo cat /var/lib/rspamd/dkim/example.com.default.pub
default._domainkey IN TXT ( "v=DKIM1; k=rsa; "
    "p=MIGfMA0GCSqGSIb3DQEBAQUAA4GNADCBiQKBgQDAfXEYcoRG7TQbIDXVvsHr6wSF7s6daT4wqDLuxaQwpnp6SADTkltqemr8IMV3TAOs5lah9+bNIEhlCPxNbXgRQqT2YxBgKfDP1pW00oTJWpy5FfNRJVrGi8MzfyOMjKrg/iwdLHm0/jftk/PnBQAyTgeEaFQxrJqc5XbbWNfvFwIDAQAB" ) ;
Create a new TXT record with host as default._domainkey and value as the above (everything inside the parentheses with extra quotes and whitespace removed).
So in the case above the record value would look like this:
"v=DKIM1; k=rsa; p=MIGfMA0GCSqGSIb3DQEBAQUAA4GNADCBiQKBgQDAfXEYcoRG7TQbIDXVvsHr6wSF7s6daT4wqDLuxaQwpnp6SADTkltqemr8IMV3TAOs5lah9+bNIEhlCPxNbXgRQqT2YxBgKfDP1pW00oTJWpy5FfNRJVrGi8MzfyOMjKrg/iwdLHm0/jftk/PnBQAyTgeEaFQxrJqc5XbbWNfvFwIDAQAB"
While we're adding records let's add an SPF and DMARC record for our domain too.
TXT @ "v=spf1 mx ~all"
Add a wildcard SPF record for subdomains too e.g. username.example.com
TXT * "v=spf1 mx ~all"
TXT _dmarc "v=DMARC1; p=none; sp=none; adkim=r; aspf=r; pct=100;"
Now we need to create a signing table to tell Rspamd which domains we want it to sign with DKIM and also which key to use.
Create a new file /etc/rspamd/local.d/dkim_signing.conf and enter the following inside:
signing_table = [
"*@example.com example.com",
"*@*.example.com example.com",
];

key_table = [
"example.com example.com:default:/var/lib/rspamd/dkim/example.com.default.key",
];

use_domain = "envelope";
allow_hdrfrom_mismatch = true;
allow_hdrfrom_mismatch_sign_networks = true;
allow_username_mismatch = true;
use_esld = true;
sign_authenticated = false;
As we want to use Authenticated Reply Chain (ARC) signing too, let's copy that file:
sudo cp /etc/rspamd/local.d/dkim_signing.conf /etc/rspamd/local.d/arc.conf
Create a new file /etc/rspamd/local.d/redis.conf and enter the following inside (making sure to update with your Redis password set earlier):
write_servers = "localhost";
password = "your-redis-password";
read_servers = "localhost";
Create a new file /etc/rspamd/local.d/classifier-bayes.conf and enter the following inside:
backend = "redis";
Create a new file /etc/rspamd/local.d/logging.inc and enter the following inside:
level = "error";
debug_modules = [];
If you want to enable greylisting (more details here) then create a new file /etc/rspamd/local.d/greylist.conf and enter the following inside:
servers = "127.0.0.1:6379";
Create a new file /etc/rspamd/local.d/history_redis.conf and enter the following inside:
subject_privacy = true;
Now let's setup the handling of DMARC for incoming messages, create a new file /etc/rspamd/local.d/dmarc.conf and enter the following inside:
actions = {
  quarantine = "add_header";
  reject = "reject";
}
Here we are telling Rspamd to add a header to any message that fails DMARC checks and has a policy of p=quarantine and to reject any message that fails DMARC checks with a policy p=reject. You can change reject to "add_header"; too if you would still like to see these messages.
Next we'll configure the headers to add, create a new file /etc/rspamd/local.d/milter_headers.conf and enter the following inside:
use = ["authentication-results", "remove-headers", "spam-header", "add_dmarc_allow_header"];

routines {
  remove-headers {
    headers {
      "X-Spam" = 0;
      "X-Spamd-Bar" = 0;
      "X-Spam-Level" = 0;
      "X-Spam-Status" = 0;
      "X-Spam-Flag" = 0;
    }
  }
  authentication-results {
    header = "X-AnonAddy-Authentication-Results";
    remove = 0;
  }
  spam-header {
    header = "X-AnonAddy-Spam";
    value = "Yes";
    remove = 0;
  }
}

custom {
  add_dmarc_allow_header = <<EOD
return function(task, common_meta)
  if task:has_symbol('DMARC_POLICY_ALLOW') then
    return nil,
    {['X-AnonAddy-Dmarc-Allow'] = 'Yes'},
    {['X-AnonAddy-Dmarc-Allow'] = 0},
    {}
  end

  return nil,
  {},
  {['X-AnonAddy-Dmarc-Allow'] = 0},
  {}
end
EOD;
}
The authentication results header will give information on whether the message passed SPF, DKIM and DMARC checks and the spam header will be added if it fails any of these.
The custom routine we've created add_dmarc_allow_header will simply add a header to messages that have the DMARC_POLICY_ALLOW symbol present Rspamd. We will use this to only allow replies / sends from aliases that are explicity permitted by their DMARC policy, in order to prevent anyone spoofing any of your recipient's email addresses.
To see the currently enabled modules in Rspamd we can run:
sudo rspamadm configdump -m
Let's disable a few modules to keep Rspamd nice and lightweight.
We can run the following command for each module we wish to disable.
echo "enabled = false;" | sudo tee -a /etc/rspamd/override.d/module_name.conf
Let's disable the following modules:
echo "enabled = false;" | sudo tee -a /etc/rspamd/override.d/fuzzy_check.conf
echo "enabled = false;" | sudo tee -a /etc/rspamd/override.d/asn.conf
echo "enabled = false;" | sudo tee -a /etc/rspamd/override.d/metadata_exporter.conf
echo "enabled = false;" | sudo tee -a /etc/rspamd/override.d/trie.conf
echo "enabled = false;" | sudo tee -a /etc/rspamd/override.d/neural.conf
echo "enabled = false;" | sudo tee -a /etc/rspamd/override.d/chartable.conf
echo "enabled = false;" | sudo tee -a /etc/rspamd/override.d/ratelimit.conf
echo "enabled = false;" | sudo tee -a /etc/rspamd/override.d/replies.conf
Restart Rspamd to reflect the changes.
sudo service rspamd restart
You can view the Rspamd web interface by creating an SSH tunnel by running the following command on your local pc:
ssh -L 11334:localhost:11334 johndoe@example.com
Then you will be able to visit http://localhost:11334/ in your web browser.
You may need to change the scores for a couple of symbols to 0 since AnonAddy uses a different email in the display from and email from.
Create a new file /etc/rspamd/local.d/groups.conf and enter the following inside:
group "headers" {
  symbols {
    "FAKE_REPLY" {
      weight = 0.0;
    }

    "FROM_NEQ_DISPLAY_NAME" {
      weight = 0.0;
    }

    "FORGED_RECIPIENTS" {
      weight = 0.0;
    }
  }
}
Restart Rspamd to reflect the changes.
sudo service rspamd restart
The web application
Next let's get the actual AnonAddy application from GitHub.
cd /var/www/
git clone https://github.com/anonaddy/anonaddy.git
cd /var/www/anonaddy
Make sure composer is installed (composer -V), if not then goto - https://getcomposer.org/download/ for instructions.
You can add the following flags when running the composer-setup.php command to add it to your $PATH:
sudo php composer-setup.php --install-dir=/usr/local/bin --filename=composer
Before running the NVM install script below make sure that you have a ~/.bashrc file. If not create one by running touch ~/.bashrc so that the NVM installer can be added to your $PATH. Also create a ~/.bash_profile and add:
if [ -f ~/.bashrc ]; then
  . ~/.bashrc
fi
Make sure node is installed (node -v) if not then install it using NVM - https://www.digitalocean.com/community/tutorials/how-to-install-node-js-on-ubuntu-22-04#option-3-installing-node-using-the-node-version-manager
At the time of writing this I'm using the latest LTS - v18.18.2
Next copy the .env.example file and update it with correct values (database password, app url, redis password etc.) then install the dependencies.
cd /var/www/anonaddy

cp .env.example .env
nano .env

composer install --prefer-dist --no-dev -o && npm install
npm run production
Make sure to update the database settings, redis password and the AnonAddy variables. You can use Redis for queue, sessions and cache.
We'll set ANONADDY_SIGNING_KEY_FINGERPRINT shortly.
APP_KEY will be generated in the next step, this is used by Laravel for securely encrypting values.
For more information on Laravel configuration please visit - https://laravel.com/docs/10.x/configuration
For the ANONADDY_DKIM_SIGNING_KEY you only need to fill in this variable if you plan to add any custom domains through the web application.
You can either use the same private DKIM signing key we generated earlier whilst setting up Rspamd.
Or you can generate a new private/public keypair and give your user johndoe ownership of the private key.
If you want to use the same key we already generated then you will need to add johndoe to the _rspamd group by running:
sudo usermod -a -G _rspamd johndoe
Make sure to also run sudo chmod g+r /var/lib/rspamd/dkim/example.com.default.key so that your johndoe user has read permissions for the file.
You may also need to run sudo chmod g+x /var/lib/rspamd/dkim.
You'll need to log out and back in again for the changes to take effect.
You can test it by running cat /var/lib/rspamd/dkim/example.com.default.key as the johndoe user to see if it can be displayed.
Then update your .env file.
ANONADDY_DKIM_SIGNING_KEY=/var/lib/rspamd/dkim/example.com.default.key
Then we will generate an app key, migrate the database, link the storage directory, clear the cache and restart the queue.
php artisan key:generate
php artisan migrate
php artisan storage:link

php artisan config:cache
php artisan view:cache
php artisan route:cache
php artisan queue:restart
We also need to add a cronjob in order to run Laravel's schedules commands.
Type crontab -e in the terminal as your johndoe user.
In the file that is opened add the following line:
* * * * * php /var/www/anonaddy/artisan schedule:run >> /dev/null 2>&1
This cronjob will run every minute which in turn runs the commands listed in app/Console/Kernel.php at the appropriate time.
Installing Supervisor
We will be using supervisor for keeping the Laravel queue worker alive.
sudo apt install supervisor
Create a new configuration file:
sudo nano /etc/supervisor/conf.d/anonaddy.conf
Enter the following inside (change user, command location and the number of processes if you need to):
[program:anonaddy]
process_name=%(program_name)s_%(process_num)02d
command=php /var/www/anonaddy/artisan queue:work redis --sleep=3 --tries=3
autostart=true
autorestart=true
user=johndoe
numprocs=8
redirect_stderr=true
stopwaitsecs=3600

Then run:
sudo supervisorctl reread

sudo supervisorctl update

sudo supervisorctl start anonaddy:*
Run sudo service nginx start to make sure Nginx is running.
Creating your account
You should now be able to visit app.example.com if you've set the correct DNS records.
Register an account and start using it straight away!
You can disable user registration after you've created your account to prevent anyone else from signing up.
Just update the value of ANONADDY_ENABLE_REGISTRATION to false in your .env file (and then run the following commands to reflect the update).
php artisan config:cache
php artisan view:cache
php artisan route:cache
Adding your private key to sign emails
If you are using encryption and want to sign your forwarded emails then you'll need to create a new GPG key pair. You must do this as the user that your web application is being run by.
To do this we can run:
gpg --full-gen-key
You will need to generate a key pair without giving it a password because php-gnupg is not able to use keys that are password protected. Leave the password blank when generating the key.
If you have issues creating the key with no passphrase then try the following command:
gpg --batch --gen-key <<EOF
%no-protection
Key-Type:1
Key-Length:4096
Subkey-Type:1
Subkey-Length:4096
Name-Real: John Doe
Name-Email: mailer@example.com
Expire-Date:0
EOF
Make sure to replace Name-Real and Name-Email with your own values.
To find your key's fingerprint run:
gpg -k
The fingerprint is 40 characters long and looks like this 26A987650243B28802524E2F809FD0D502E2F695.
Then update the value of ANONADDY_SIGNING_KEY_FINGERPRINT= in your .env file to match the fingerprint of your key.
Then run php artisan config:cache to update.
Setting up a local caching DNS resolver
This is to speed up queries and to prevent you getting rate limited when querying DNSBLs (DNS black lists) etc.
Follow the below blog post on how to install bind9.
https://www.linuxbabe.com/ubuntu/set-up-local-dns-resolver-ubuntu-20-04-bind9
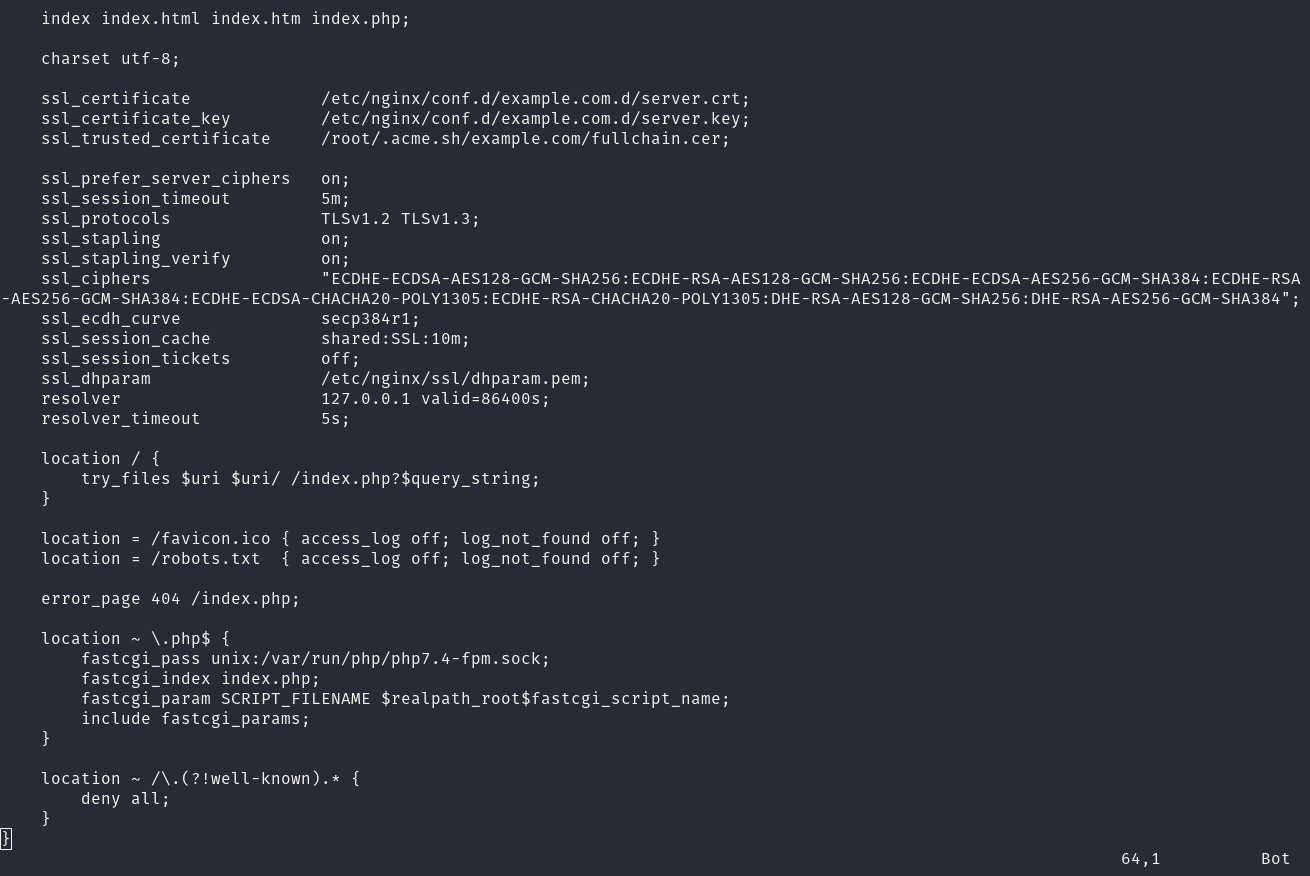
Now open up /etc/nginx/conf.d/example.com.conf and add these two lines below the ssl parameters.
resolver                    127.0.0.1 valid=86400s;
resolver_timeout            5s;
Restart nginx:
sudo service nginx restart
Restart the server by running sudo reboot and then SSH back in.
Next to test if everything is working run:
host -tTXT 2.0.0.127.multi.uribl.com
You should see the response
2.0.0.127.multi.uribl.com descriptive text "permanent testpoint"
This means you can query URIBL successfully now.
Create a new file /etc/rspamd/local.d/options.inc and enter the following inside:
dns {
  nameserver = ["127.0.0.1:53:1"];
}
This will tell Rspamd to use our new local DNS resolver. Restart Rspamd to reflect the change.
sudo service rspamd restart
Adding MTA Strict Transport Security and SMTP TLS Reporting
MTA-STS allows mail service providers to declare their ability to receive Transport Layer Security (TLS) secure SMTP connections. It also allows them to specify whether sending SMTP servers should refuse to deliver to MX hosts that do not offer TLS with a trusted server certificate.
Let's add a new Nginx block /etc/nginx/conf.d/wildcard.example.com.conf
server {
    listen 80;
    listen [::]:80;

    server_name *.example.com;
    return 301 https://$server_name$request_uri;
}

server {
    listen 443 ssl;
    listen [::]:443 ssl;
    server_name *.example.com;
    server_tokens off;
    http2 on;
    add_header X-Frame-Options "SAMEORIGIN";
    add_header X-XSS-Protection "1; mode=block";
    add_header X-Content-Type-Options "nosniff";
    add_header Strict-Transport-Security "max-age=63072000; includeSubDomains; preload";
    add_header Content-Security-Policy "default-src 'self'; script-src 'self' 'unsafe-inline' 'unsafe-eval'; img-src 'self' data:; style-src 'self' 'unsafe-inline'; font-src 'self'; object-src 'none'";
    add_header Referrer-Policy "origin-when-cross-origin";
    add_header Expect-CT "enforce, max-age=604800";

    index index.html;

    charset utf-8;

    ssl_certificate             /etc/nginx/conf.d/example.com.d/server.crt;
    ssl_certificate_key         /etc/nginx/conf.d/example.com.d/server.key;
    ssl_trusted_certificate     /root/.acme.sh/example.com/fullchain.cer;

    ssl_prefer_server_ciphers   on;
    ssl_session_timeout         5m;
    ssl_protocols               TLSv1.2 TLSv1.3;
    ssl_stapling                on;
    ssl_stapling_verify         on;
    ssl_ciphers                 "ECDHE-ECDSA-AES128-GCM-SHA256:ECDHE-RSA-AES128-GCM-SHA256:ECDHE-ECDSA-AES256-GCM-SHA384:ECDHE-RSA-AES256-GCM-SHA384:ECDHE-ECDSA-CHACHA20-POLY1305:ECDHE-RSA-CHACHA20-POLY1305:DHE-RSA-AES128-GCM-SHA256:DHE-RSA-AES256-GCM-SHA384";
    ssl_ecdh_curve              secp384r1;
    ssl_session_cache           shared:SSL:10m;
    ssl_session_tickets         off;
    ssl_dhparam                 /etc/nginx/ssl/dhparam.pem;

    location / {
        add_header Content-Type text/plain;
        return 200 'Hello world';
    }

    location = /favicon.ico { return 204; access_log off; log_not_found off; }
    location = /robots.txt  { access_log off; log_not_found off; }

    location ~ /\.(?!well-known).* {
        deny all;
    }

    location ^~ /.well-known/mta-sts.txt {
        try_files $uri @mta-sts;
    }
    location @mta-sts {
        add_header Content-Type text/plain;
        return 200 "version: STSv1
    mode: enforce
    max_age: 10368000
    mx: mail.example.com\n";
    }
}
Replace any mention of example.com with your own domain and restart Nginx:
sudo service nginx restart
Now we need to add a new TXT record for our domain:
You can use any unqiue value for the id, I've just used a UNIX timestamp that you can get by running the following command in the terminal:
date +%s
The name/host for this record is _mta-sts.
TXT _mta-sts "v=STSv1; id=1603899738;"
SMTP TLS Reporting is a standard that enables reporting of TLS connectivity problems experienced by applications that send email. It's easy to implement.
Add new TXT record to your domain with a name/host of _smtp._tls:
TXT _smtp._tls "v=TLSRPTv1; rua=mailto:tlsrpt@example.com"
You can enter any email you like as the one to receive reports.
Enabling DANE by implementing DNSSEC and adding a TLSA record
DNS Secturity Extensions (DNSSEC) protects the user from getting bad data from a signed zone by detecting the attack and preventing the user from receiving any tampered data.
In order to generate our TLSA record you can run the following command:
printf '_25._tcp.%s. IN TLSA 3 1 1 %s\n' \
        mail.example.com \
        $(openssl x509 -in /etc/nginx/conf.d/example.com.d/server.crt -noout -pubkey |
            openssl pkey -pubin -outform DER |
            openssl dgst -sha256 -binary |
            hexdump -ve '/1 "%02x"')
Or you can use the following website to generate it - https://www.huque.com/bin/gen_tlsa
As mentioned earlier, some providers such as Vultr do not allow you to add a TLSA record via their DNS manager.
You can check if DANE is configured correctly using this site - https://www.huque.com/bin/danecheck-smtp
Adding Certification Authority Authorization
Certification Authority Authorization (CAA) is a standard that allows domain name owners to restrict which CAs are allowed to issue certificates for their domains. This can help to reduce the chance of misissuance, either accidentally or maliciously.
Since our certificate is issued by Let's Encrypt we should add the following CAA records:
CAA @ 0 issue "letsencrypt.org"
CAA @ 0 issuewild "letsencrypt.org"
CAA @ 0 iodef "mailto:caapolicy@example.com"
Updating
Before updating, please check the release notes on GitHub for any breaking changes.
To update to the latest version run the following commands:
# Fetch the tags from the remote repository
git fetch --tags

# Set a variable with the latest tag (release version)
tag=$(git describe --tags `git rev-list --tags --max-count=1`)

# You can check the version by typing:
echo $tag

# Checkout the latest release, note: if you have made any local changes they will be overwritten by this command
git checkout --force $tag -b $tag

# Install dependencies
composer install --prefer-dist --no-dev -o
npm install

# Compile assets
npm run production

# Run any database migrations
php artisan migrate

# Clear cache
php artisan config:cache
php artisan view:cache
php artisan route:cache
php artisan event:cache

# Restart queue workers to reflect changes
php artisan queue:restart
Credits
A big thank you to Xiao Guoan over at linuxbabe.com for all of his amazing articles. I highly recommend you subscribe to his newsletter.